Lemons make me happy. Having a friend that supplies me with bags and boxes of lemons makes me ecstatic! One day I will have a lemon tree in my life, but until then I will use any and all lemons that come my way.
What is so fun and exciting about lemons? Personally, what I love most about lemons is that they have so many uses other than culinary. Lemons aren’t just for drinks and cocktails, they also have several health benefits as well. According to lemonmania.com lemon juice can help those with colds and the flu, those with restless leg syndrome, and can even help those that are stressed out or have warts! Lemon juice is also a great natural disinfectant and non-toxic cleaner. I recently started making my own house cleaning products and lemons are an absolute gem, especially, when it comes to cleaning a wooden cutting board. Lemon juice is also fantastic in homemade beauty treatments and can add a wonderful scent to candles and air fresheners. Lemons also make a simple and beautiful centerpiece and are lovely when used in place of flowers. I could go on and on and on about my love for lemons, but today I want to share with you something that I’ve never done before with lemons and that is- preserving them. Truthfully, I don’t know what I’m going to with them after they are preserved, so FYI, I’m open to suggestions!
After researching several different recipes I found the easiest and fastest way to preserve lemons isn’t by following a recipe at all. Thanks to the Food Gal, Carolyn Jung’s, instructions all you have to do is follow a few steps and in a matter of minutes you’ll have jars of lemons in a salty brine that will be ready to use in recipes in 3 to 6 weeks. Please check out her article here , it’s a fun read and I love her photos! For delicious wine and food filled tweets be sure to follow the Food Gal on Twitter as well @CarolynJung.
So, here is what you need:
-
Organic lemons, washed and dried.
-
Kosher salt
-
Sterilized glass jars with lid (Food Gal suggests sterilizing in the dishwasher)
This is what you do:
-
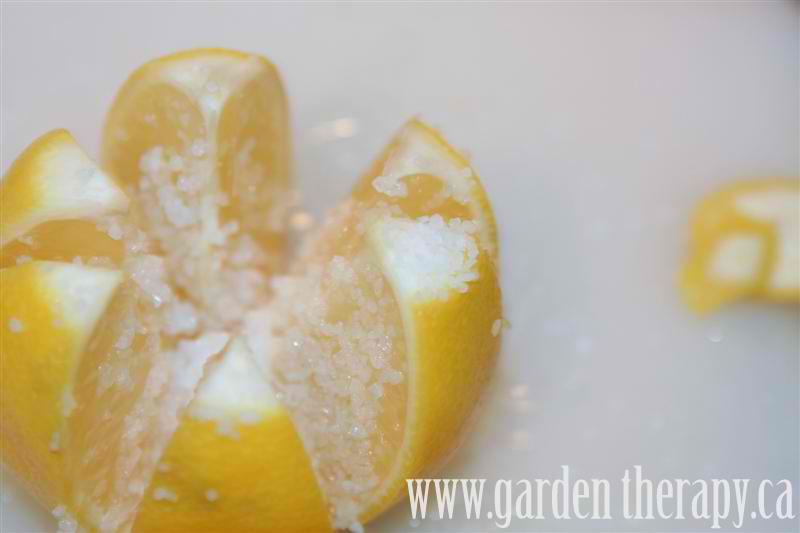
Cut lemon in quarters from the top without cutting through to the bottom (see photo below) I wasn’t able to do this because my lemons were big and my jars were small.
-
Stuff the cavity of the lemon with Kosher salt.
-
Add a little Kosher salt to the bottom of the jar and then start layering as many of the salted lemons as you can into the jar.
-
Cap jar and leave on your kitchen counter for up to three weeks, shaking jar daily to distribute the brine.
This is the proper way for cutting lemon before stuffing them in the jars. Photo is used with permission from Stevie Rose at www.gardentherapy.ca. Stevie also has an excellent post on preserving lemons found here. Do yourself a favor and check out this refreshing and inpspiring blog for the latest gardening tips, weekend crafts projects, recipes and tutorials on making homemade bath and body products. Garden Therapy can also be found on Twitter, Pinterest, Facebook and also has a great line of gorgeous botanical pillows on Etsy. Thanks for letting me use your photo Stevie!
That’s how easy it is! After about a week I added some more lemon juice to my brining lemons because I was concerned about them not being totally immersed in liquid. I didn’t use Meyer lemons so maybe they didn’t exude as much juice as was expected. At 3 weeks I transferred the jars of preserved lemons to the refrigerator. In a few more weeks I plan on cooking up a Moroccan feast featuring my new found love…the preserved lemon. Have you cooked or prepared recipes calling for preserved lemons? What is your favorite dish to prepare? I’d love to hear your suggestions so please leave a comment here, or send me a message on Twitter or my Facebook page.


